Monday, October 27, 2008

My AFFUG Presentation: Exploring the Flex Data Services Framework - From Prototypes to Large-Scale Applications

Earlier this month I gave a presentation to the Atlanta Flash and Flex User Group (AFFUG) on Flex Data Services and specifically on how to evolve an application from prototype to a large-scale application.

I'd like to thank AFFUG for the opportunity to speak, and specifically John Mason and FusionLink who coordinated and hosted the event, as well as Adobe for sponsoring it (and providing swag, etc).

Presentation Summary

Exploring the Flex Data Services Framework: From Prototypes to Large-Scale Applications


So you've built a few data-driven apps with Flex from the examples and prototypes you found online and your boss loved them. But now you are tasked with building a much larger application and canned examples just don't offer any help. How do you manage data across many components? When should you use bindings? How can views independently filter and sort the same data without affecting each other or duplicating data in memory? How do you manage multiple simultaneous calls from across the application?

In this session we will answer these questions by begin with the simple examples and gradually evolve into methods for managing data within applications of increasing scale and complexity. Whether you have been developing Flex applications for years or are just getting started, you will likely learn something during this discussion. The focus here will not necessarily be on any particular patterns for application architecture, but rather the tools that Flex provides in the framework that will allow you to create the architecture that applies to your project needs.

Some of the framework components we will cover include: WebService, HTTPService, RemoteObject, AbstractOperation, LoadEvent, ResultEvent, FaultEvent, AsyncToken, IResponder, ItemResponder, ArrayCollection, ListCollectionView.

We will also open the floor for questions or additional ideas and experiences with managing data in Flex.

Regular Expressions and the new Regular Expression Explorer


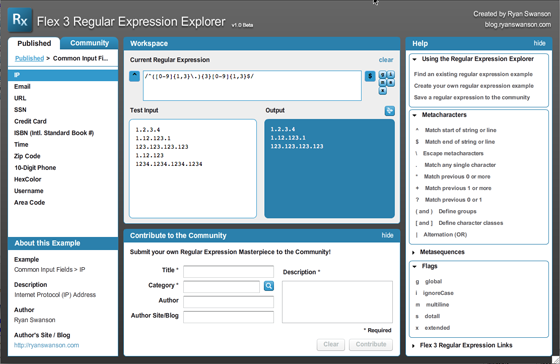
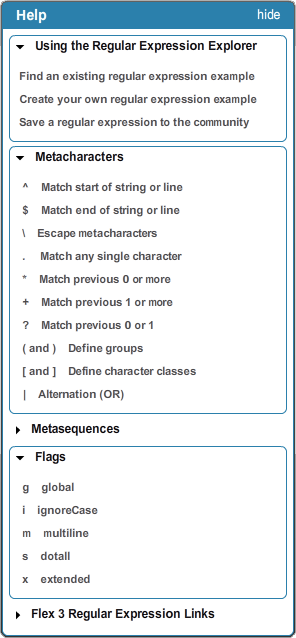
Flex's support for regular expressions is a powerful tool for developing sophisticated applications; however, working with regular expression syntax is often a challenge for those who have not come from a traditional software engineering background. In this session we will give a basic overview for using regular expressions in Flex as well as to introduce the Regular Expression Explorer, a new tool for rapidly creating regular expression patterns and sharing them with the community.
This presentation summary can also be found in AFFUG's presentation archive.

Application Architecture

Please note that while I illustrate a particular application architecture during this presentation, I am certainly not suggesting that it is relevant for all applications. I mostly wanted to explore the architectural concepts involved in each stage of the application's life-cycle.

After watching the presentation, the viewer should understand the benefits of flexibility, reuse, scalability, etc. that are provided by each additional layer of abstraction that is added as the application progresses.

As always in designing application architectures, the patterns and abstractions you create should be adapted to the problem you are trying to solve rather than trying to adapt your solution to match a 'prescribed' pattern or architecture.

Presentation Video

Fortunately, John was able to record my presentation with Adobe Connect Pro and can be viewed through the link below.

affugpresentationconnect.png

View the presentation through Adobe Connect

Presentation Deck / Slides

After presenting, I added an additional slide at the end that includes some of the sites I referenced during the presentation.

affugpresentation.png

View the presentation deck (powerpoint)

Yahoo! Image Search - Application Source

For the presentation, I created an application called Yahoo! Image Search, which uses the Yahoo! Image Search service. I built it in 4 stages, from a basic hard-coded prototype up through a full-featured application that supports searching as well as history browsing through 2 independent history viewers.

yahooimagesearch_small.png

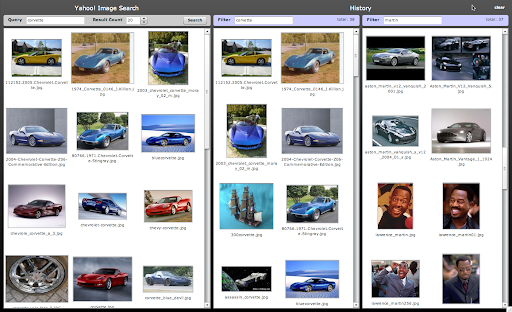
Download the application source (Flex Project)

I hope you find this presentation valuable, and as always please feel free to send me your comments and feedback!

Cheers!
Ryan

Friday, October 17, 2008

Introducing: The Flex 3 Regular Expression Explorer

Tools: A better way to work.

If you've worked with Flex for more than 5 minutes, you've undoubtedly seen the Adobe-provided Flex 3 Style Explorer and Flex 3 Component Explorer. You may have even seen some similar Explorer-style applications developed by the community such as the Flex 2 Primitive Explorer by Jason Hawryluk at Flexible Experiments.

So what is the allure of these applications? Simply put: Instant Gratification.

Each of these applications allows you to explorer and learn what is possible in code with Flex without actually having to create, compile and run it yourself. As a result, you can quickly figure out what component you should use for an application, what CSS is necessary to style your component correctly or how to create a primitive shape that meets your needs. In other words, it increases your productivity as a developer/designer. And for us, time is money.

For a while now, I have felt that one Flex technology in particular was just screaming for this kind of application: Regular Expressions.

So I built one and am releasing it to the community for free!

Launch the Regular Expression Explorer

regexp.png

As I was designing this application, I realized there were a number of significant limitations of the other Explorer-style applications and have added features to make the tool more collaborative and easy to use.

Explorer-style interactions: The Workspace

Following the basic concept of an 'Explorer' application, the Regular Expression Explorer provides a Workspace where you can define a regular expression, provide a list of test data and then receive immediate feedback of the results as a list of the input data that matched the expression.

Included in the workspace are some convenient tools for editing various aspects of the expression including start match, end match, and flags: global, ignore case, multiline, dotall, and extended. You can also clear the current expression and test data to start over from scratch.

A link for working with output data has been added recently; however, it is not fully implemented and may ultimately be provided through a 'premium edition' that will have a reasonable purchase price. The future plan for this is to support translating between Flex's regular expression syntax and that of other languages like Java, C++, etc.

Syntax Translation will be a very powerful feature and I hope to have time to build it soon. It will allow you to find examples for other languages and bring it into the Explorer to use in Flex projects. It also makes this tool relevant for people who don't code in Flex as they could use this tool for authoring or finding a pre-authored example and simply translate the expression to the language of their choosing.

Regular Expression Explorer:  Workspace


workspace.png

Example Library

There are 2 parts of the example library: Published and Community.

Myself and a few cohorts will be maintaining the Published section. We will include both examples we have created as well as promoting quality examples we find in the community section to the published section.

The main point of keeping the published section separate is to have some semblance of quality and organization.

The community section is appropriately a free-for-all since we want users to have the freedom to create and publish as they see fit.

Regular Expression Explorer:  Example Library


examples.png

Community Contributions

Collaboration is the true power of the Regular Expression Explorer.

For many people, regular expressions are an inaccessible, mystical art that they struggle to comprehend and often fail in trying or just give up. In the Flash and Flex community of designers, devigners and developers, there are often a lot of very talented people who have simply never had formal training or degrees in computer science or engineering that would have taught them the concepts of pattern matching, lexical analysis and the like.

For those of us who are quite familiar with regular expressions, they are tedious at best. We love the power of regular expressions, but who really likes writing them when you have deadlines and money to be made? ...well, I guess there is that guy :)

This is where the Regular Expression Explorer's collaborative community steps in.

Everyone in the community can contribute an expression they've spent time creating in the tool. And the cost to them is nominal: just type in a few pieces of metadata and click 'Contribute'. Contributors also get credit for their work in the form of a by-line and a link to their own site.

As the community builds a library of regular expressions, we all profit.

People who simply don't understand them can now find an existing example, paste in their own test data to prove it out for their use and then copy and paste the example into their own work.

Those of us who know regular expressions can quickly find if the example we need is out there. And if not, once we've created it, we can now get credit by publishing our work to the world!

Sounds like a win-win-win to me.

Regular Expression Explorer:  Contribute to the Community


contribute.png

Help!!!

When working with a complex, highly-syntactical technology like regular expressions, providing help resources is crucial for empowering the user.

So, I built a contextual help panel into the interface that can be hidden while the user is working. There are 4 primary features provided by the Help panel:

Application Help


The 'Using the Regular Expression Explorer' section includes a series of guides for common user goals as well as tips and tricks for using the interface.

Regular Expression Quick Reference


The 'Metacharacters', 'Metasequences' and 'Flags' sections are quick references to the mostly commonly used aspects of regular expressions. Many of the descriptions include links to Adobe's Flex Reference material, which includes additional details on each item.

Reference Material


The 'Flex 3 Regular Expression Links' section includes quickly accessible links to all of the regular expression-related documents provided by Adobe as well as some additional references and examples.

Interface Highlighting


Throughout the Help panel, whenever a user interface element (panel, tool, button, list, etc.) is referenced, it provides a link to highlight that component directly within the application. This avoids any confusion in terminology and speeds a user's understanding and adoption of the tool.

Regular Expression Explorer:  Help System


help.png

Tell your friends!

As with any collaborative tool, the power is in the community. So if you like the Regular Expression Explorer, help me (and in turn yourself) by spreading the word!

As always, I love to get feedback and ideas for ways to improve my work, so please leave a comment and let me know what you think.

Cheers,
Ryan

Friday, May 16, 2008

In Place Editing: Extended

Background


A long time ago (a couple years seems like forever these days), Flex guru Ely Greenfield created and posted a collection of In Place Editing Controls that each basically use composition to combine some form of read-only control, such as Label or Text, with an editable control, such as TextInput or TextArea.

The editable and non-editable controls are mutually exclusive (e.g. only one is shown at a time) and are both driven by the same data so that they function as a single component with 2 distinct views or modes. Each IPE control has an editable attribute that defines which view should be shown. To make it the hotness, Ely also includes a FlipBitmap transition between edit and non-edit modes.

In this post, I will describe a few techniques I used (including some minor tweaks to his controls) to support more complex form layouts with in place editing. A lot of this work was done in collaboration with my close friend and colleague, Frankie Loscavio, who has been my inspiration to get started blogging!

IPE In Action


So, recently I was working on a project that was suited for this type of functionality and I decided to dust off Ely's IPE controls and give them try. For the most part, the controls worked as I had expected/remembered, however, the biggest problem I ran into was that I couldn't independently size the editable and non-editable controls.

So lets use an example. Here are 3 IPETextInput fields with a width set to 140. In both editable and non-editable modes, the width is the same, fixed value.

Note: Red dotted lines indicate component bounds for purpose of illustrating fixed dimension.

ipe1.png


Now, this is fine as long as you have all of your fields on separate lines, but my project had a very dense form with a lot of information, so space was at a premium. What I wanted to happen was to have the read-only mode show information collapsed down to its actual size and with related information on the same line. By contrast. the edit mode would show the form fields at the requisite larger sizes, which typically required them to be on separate lines.

Layout Concepts


Read Only Layout


Typically, the optimal layout for read-only data is naturally condensed, often with additional delimiters between particular fields that indicate their relationship rather than their actual value.

The best example is probably an address. The city, state and zip code are each distinct fields; however, they are typically formatted together in one line:

Atlanta, GA 30319-1234

The aspects to note here are that all fields are on the same line and are sized to the dimension of their content (text), and that various delimiters exist between fields based on existence of adjacent fields. For example, the hyphen in the zip code should only appear if both parts (5 + 4) of the zip code exist.

A simpler example could be a person's name:

Ryan Patrick Swanson

In read only view, the layout only requires that the fields are on the same line and collapsed to the size of the text.

Editing Layout


The optimal layout for an editable form is quite different from the read-only layout. Each input field is usually a fixed dimension that is large enough to display the typical length of data. Also, to be aesthetically pleasing, the fields will usually be sized to line up with each other. This often means that fields that would be together on the same line when in read-only layout are on separate lines for editing to allow for a larger input field.

First Step: Box is your friend


Many people I talk to are familiar with HBox and VBox, but often aren't aware that they are just specific-use subclasses of the Box class, which has a direction attribute that can be changed at runtime to switch the axis of layout for the Box's child components. If you haven't guessed it yet, this is how we solve half our problem.

So now we take our previous example put the 3 controls into a Box that will switch direction from vertical to horizontal as the form changes from editable to non-editable.

ipe3.png


...and the code that would accomplish this:

[Bindable] private var editing:Boolean = false;
...
<mx:Box horizontalGap="0" verticalGap="0" direction="{(editing) ? 'vertical' : 'horizontal'}">
<ipeControls:IPETextInput id="firstNameField" editable="{editing}"
text="{contact.firstName}" />
<ipeControls:IPETextInput id="middleNameField" editable="{editing}"
text="{contact.middleName}" />
<ipeControls:IPETextInput id="lastNameField" editable="{editing}"
text="{contact.lastName}" />
</mx:Box>


Second Step: measureText() is also your Friend


For many years and in working with many interface technologies, I have wished I had a relatively simple and valid way to determine the dimension that text will be rendered with a control that has some (arbitrary and unknown to me) styling applied to it. Props to Adobe on this one, Flex has it and after really digging into the underlying source code, it appears to be done in a way that I approve of (if you know me, this doesn't happen too often)!

UIComponent includes 2 functions for measuring text in the context of the stylesheets applied to the class that extends UIComponent: measureText() and measureHTMLText().

In working with Frankie Loscavio on a similar problem regarding measurement of styled text, he initially discovered these functions and we have since found a number of uses for them. For more information on measureText(), please read his blog posting.

So the solution to our problem is to simply set (through bindings) the width of our components conditionally (based on an editing flag) between a fixed size for editing and a measured size for read-only.

<ipeControls:IPETextInput id="firstNameField" editable="{editing}"
text="{contact.firstName}"
width="{(editing) ? 150 :
Math.max(firstNameField.label.measureText(firstNameField.text).width + 4, 1)}" />


Note: I have found I sometimes need to add an offset (4 in the example above) to the measured value, and I am assuming this may be due to padding or some other aspect of the component that is not included in the measurement.

Final Product


So combining these concepts and adding a little polish, here is a simple example of a contact form with name and address information. Full source code is included (right click -> View Source).


Example

Flex Project

Cheers,
Ryan

Friday, May 2, 2008

Flex Builder License Reset

I recently ran into a license key issue with Flex Builder and wanted to share my resolution to the problem.

In a nutshell, I had upgraded from Flex 2 to Flex 3, but accidentally got the Standard version instead of Pro.  I had already entered the license key for Standard and when I went to enter the key for Pro, it balked since it was expecting a Flex 3 Standard to Flex 3 Pro ($499) license key, but the one I purchased was for Flex 2 Pro to Flex 3 Pro ($299).

I simply wanted to get back to the dialog where I could enter my previous Flex 2 Pro key and the new Flex 3 Pro key.

I figured out that I could resolve my problem by first clearing the license # from my license.properties file at:

Windows: %ALLUSERSPROFILE%\Application Data\Adobe\Flex\license.properties
Mac: /Library/Application Support/Adobe/Flex/license.properties

I then restarted Flex Builder and was able to enter my new license information successfully.

Cheers!
Ryan

Blogged with the Flock Browser

Monday, February 25, 2008

Papervision3D Holiday Card for Think Inc.

This past fall I worked with Bryan Wills and the team at Think Interactive, Inc. to create a 3D Holiday Card using Flex 3 Beta 2 and Papervision3D v1.0.

As is often the case, this project was fairly aggressive regarding time and budget, but fortunately using Flex 3 and some open source code we were able to get a final solution that performs decently and is pretty fun to use.

You can try out the application here: Happy Holidays from THINK Interactive.

Where's the Source Code?

I will try to get the source code posted soon if I am able to get it approved by the guys at Think. And I'm sure I'll get it out sooner if people request it (curse me) in the comments.

Holiday Introduction - Setting the Stage

Since this is a holiday card, there is a nice flash movie to set the holiday mood. Bryan Wills did the majority of this work and as always, he does a great job!

thinkholidayintro_thumb.jpg
thinkholidayhouse_thumb.jpg
thinkholidayowners_thumb.jpg

Holiday Party in a Snow Globe

The intro movie completes as you are zoomed into the snow globe at which point you will be in a PaperVision3D environment that has the whole Think Inc. staff inside wearing their holiday garb. Since there are a LOT of people inside, we quickly found that trying to render true 3D COLLADA models of all of the employees was too costly, both in performance and dev time, so we simply load optimized PNG images into Plane components and then manage their rotation so they will always face the camera as it flies around the room.

We initially included COLLADA models for christmas trees, candy canes, presents, etc., but again found it made the room too cluttered and impacted performance too much. This reflects the number of images we were loading (and quality of images that we required) as well as the included audio. In general we have found PaperVision3D to perform very well even with COLLADA models. There are also a number of capabilities with culling and other techniques that can gain performance, but were outside the scope and timeline of this project.

As a side note, we found some clipping issues with Planes close to the camera's focal point, which you may notice this as you navigate around the app. Comments and ideas for fixing this are welcome, though of course, this one is out the door already!

thinkholidayparty_thumb.jpg

Interaction

We went through a dozen or so interaction designs before deciding to keep things simple. Users can pan the camera's view using the mouse position and navigate to view an individual person by clicking on the image of the person or by selecting the person's thumbnail (head) in the fisheye control at the bottom. (props to Ely Greenfield for the use of his Fisheye component).

Users can also use the keyboard to walk around the room, though this was considered a secondary type of navigation since most users wouldn't know to do that (and we didn't want to clutter the interface with instructions for usage).

thinkholidaybryanwills_thumb.jpg

Hope you'll check out the holiday card and give developing with Papervision3D a try. It was a blast to work with and I'm just looking for another opportunity to work on a project with it.

Ryan

Co-Author

Bryan Wills - Think Interactive, Inc.
Bryan's Blog at Think

Contributor

Frankie Loscavio - Frankie's Blog

Thanks to Frankie for all his help researching Papervision3D and COLLADA and in working with various 3D programs (Cinema 4D, 3DS Max, others). Although much of the 3D modeling work we did wasn't included in the final release, the learning experience for me was incredible. If you haven't checked out Frankie's blog and you do any Flex development or design work, you are missing out! He does some awesome work.

Credits

Flex 3 by Adobe

Papervision3D - Core Team: Carlos Ulloa, John Grden, Ralph Hauwert, Tim Knip and Andy Zupko

Fisheye component by Ely Greenfield